Embarking on a KitchenAid Pasta Making Adventure
Unleashing Culinary Creativity with KitchenAid pasta recipe
Welcome to the exciting world of KitchenAid pasta recipe , a culinary journey that combines tradition with innovation. With your KitchenAid at your side, this adventure transforms simple ingredients into an array of stunning pasta dishes. This guide is designed to unlock your culinary creativity, taking you through the satisfying process of crafting pasta from scratch. From the tactile pleasure of kneading dough to the joy of watching it transform into beautiful, edible art, making pasta at home is an enriching experience. Whether you’re a seasoned chef or a curious novice, the KitchenAid mixer, with its versatile attachments, opens up a realm of possibilities, making pasta making accessible and enjoyable. So, gather your ingredients, attach your dough hook, and let’s begin this flavorful journey into the heart of homemade pasta.
The Essentials of KitchenAid Pasta Dough Preparation
Crafting the Perfect Dough with Quality Ingredients
Embarking on the journey of pasta dough preparation with your kitchenaid is an exploration of both science and art. The key to creating the perfect pasta dough lies in understanding the role and balance of each ingredient. This section will guide you through the essentials of preparing pasta dough using your KitchenAid, ensuring that every batch turns out just right.
- Selecting the Right Flour: The choice of flour can significantly impact the texture and taste of your pasta. All-purpose flour is great for beginners and yields a softer pasta, while semolina flour, with its higher gluten content, is ideal for a chewier texture and traditional flavor.
- The Importance of Eggs: Eggs are crucial in pasta dough for their binding properties. They add richness, provide structure, and contribute to the dough’s elasticity. The freshness and quality of the eggs can also affect the dough’s color and taste.
- Incorporating Salt for Flavor: Salt is more than just a seasoning; it enhances the natural flavors of the pasta. Integrating salt into the dough rather than just the cooking water ensures a well-seasoned pasta.
- Balancing with Water: While not always necessary, water can be added to adjust the dough’s moisture level. It’s important to add water gradually to achieve the desired consistency without making the dough too sticky.
- Adding Olive Oil for Texture: A small amount of olive oil can improve the dough’s texture, making it smoother and easier to work with. It also adds a subtle flavor that complements the pasta.
Using your kitchenaid for pasta dough preparation simplifies the process. The mixer’s dough hook efficiently combines the ingredients and kneads the dough to the perfect consistency. This hands-off approach allows for more consistent results and a smoother pasta-making experience.
Key Ingredients for KitchenAid Pasta Recipe Perfection
Blending Flours and Eggs for Ideal Pasta Texture
Creating the perfect pasta dough is an art that begins with selecting the right ingredients. Your KitchenAid pasta recipe is ready to transform these basic components into a dough that’s the foundation of countless delicious pasta dishes. Let’s explore the essential ingredients that contribute to pasta perfection:
- Choosing the Right Flour: The type of flour you use is crucial in determining the texture of your pasta. All-purpose flour is a versatile option that yields a tender pasta, suitable for a variety of dishes. For a more authentic, al dente texture, semolina flour is the preferred choice among many pasta enthusiasts. It’s made from durum wheat and gives the pasta a firmer bite and a delightful golden color.
- The Role of Eggs: Eggs are the binding force in pasta dough. They add richness, color, and structure. The yolks contribute to the dough’s pliability and moisture, while the whites provide strength. Fresh, high-quality eggs can make a significant difference in the taste and texture of your pasta.
- Incorporating Salt: Salt is a small but mighty ingredient in pasta dough. It enhances the flavor of the pasta itself, not just the sauce or toppings it’s paired with. A pinch of salt mixed into the dough goes a long way in bringing out the natural flavors of your ingredients.
- Water and Olive Oil: While not always necessary, a little water can be added to adjust the dough’s moisture, especially in dryer climates or with certain flours. Olive oil can be included for an extra touch of richness and to make the dough more supple and easier to work with.
By understanding the role of each of these ingredients, you can experiment with different combinations and ratios to find the perfect blend for your desired pasta type. With your KitchenAid mixer, combining these ingredients becomes a seamless and enjoyable process, setting you up for pasta-making success.
Decoding the Elements of a Flawless Pasta Dough
How Each Ingredient Enhances Your Pasta Experience
In the art of pasta making, every ingredient plays a pivotal role in shaping the final product. Understanding how each component contributes to the dough’s texture, flavor, and consistency is key to achieving pasta perfection. Let’s delve into the function of each ingredient and how they collectively enhance your pasta experience:
- Flour: The Foundation: Flour is the primary structure-building ingredient in pasta dough. The type of flour used dictates the pasta’s texture. All-purpose flour yields a softer, more tender pasta, while semolina flour, made from durum wheat, offers a firmer bite and a more robust structure, making it ideal for holding onto hearty sauces.
- Eggs: Richness and Binding: Eggs play a dual role in pasta dough. They act as a binder, holding the flour together, and impart richness and color to the pasta. The yolks add fat, which contributes to the dough’s smoothness and elasticity, making it easier to work with and giving the cooked pasta a luxurious mouthfeel.
- Salt: Flavor Enhancer: Salt is a crucial flavor enhancer in pasta dough. It doesn’t just season the dough; it brings out the natural flavors of the other ingredients. Even in small quantities, salt can significantly impact the overall taste of the pasta.
- Water-Moisture Adjuster: Water is often added to pasta dough to adjust its moisture content. It’s particularly useful in drier climates or when working with harder flours. Water helps to hydrate the flour, making the dough more pliable and easier to knead.
- Olive Oil: Added Richness: While not a traditional ingredient in all pasta recipes, olive oil can be added for extra richness. It lends a subtle flavor and helps create a smoother dough, enhancing the pasta’s texture and making it less likely to stick during rolling and shaping.
By mastering the balance and role of these ingredients, you can create a pasta dough that’s not only a joy to work with but also a delight to eat. Your KitchenAid pasta recipe, with its precise mixing capabilities, makes it easier to combine these elements into a harmonious dough, ready to be transformed into a variety of pasta shapes and styles.
Mastering Dough Preparation with KitchenAid
Efficient Kneading Techniques Using KitchenAid Attachments
Embracing the power of your KitchenAid pasta recipe for pasta dough preparation is a game-changer in the world of homemade pasta. This section will guide you through the efficient and effective techniques of using your KitchenAid to knead and prepare the perfect pasta dough.
- Setting Up Your KitchenAid: Begin by attaching the dough hook to your KitchenAid mixer. This attachment is specifically designed for kneading dough, making it an ideal tool for pasta preparation.
- Combining Ingredients: Start by adding your flour and salt to the KitchenAid mixer bowl. Turn the mixer on a low setting to gently combine these dry ingredients.
- Gradually Adding Wet Ingredients: With the mixer still on low, gradually add in your beaten eggs. If your recipe calls for water or olive oil, slowly incorporate it at this stage. The gradual addition ensures that the wet and dry ingredients are evenly mixed, forming a cohesive dough.
- Kneading the Dough: Once all ingredients are in the bowl, increase the speed to medium. Let the KitchenAid work its magic, kneading the dough for about 5-7 minutes. You’re looking for a smooth, elastic texture. The dough should be firm yet pliable, and not sticky to the touch.
- Resting the Dough: After kneading, it’s important to let the dough rest. Remove it from the bowl, wrap it in plastic wrap, and let it sit at room temperature for at least 30 minutes. This resting period allows the gluten in the dough to relax, making it easier to roll and shape later.
- Utilizing KitchenAid Pasta Attachments: For rolling and cutting your pasta, KitchenAid offers a variety of attachments, such as the pasta roller and cutters for spaghetti and fettuccine. These attachments can be easily attached to your mixer, transforming it into a multi-functional pasta-making machine.
By following these steps, your KitchenAid mixer becomes an invaluable ally in pasta making, turning a potentially labor-intensive process into a smooth, enjoyable experience. In the next section, we’ll explore the art of rolling and cutting pasta, bringing you one step closer to enjoying delicious homemade pasta.
Step-by-Step Guide to KitchenAid Pasta Dough
Mixing, Kneading, and Resting Your Pasta Dough
Creating the perfect pasta dough with your KitchenAid mixer is a straightforward and satisfying process. This step-by-step guide will walk you through the stages of mixing, kneading, and resting your dough, ensuring you achieve the ideal consistency every time.
- Starting with the Basics: Begin by attaching the dough hook to your KitchenAid mixer. This attachment is specifically designed for dough making and will provide the necessary kneading action.
- Combining Dry Ingredients: In the mixer’s bowl, add your chosen flour and a pinch of salt. Start the mixer on a low speed to gently combine these dry ingredients. This initial step ensures an even distribution of salt throughout the flour.
- Adding Wet Ingredients: Gradually introduce the eggs to the flour mixture. If your recipe includes water or olive oil, add it slowly at this stage. The slow addition of wet ingredients is crucial for achieving a uniform dough.
- Kneading the Dough: Once all ingredients are incorporated, increase the mixer’s speed to medium. Allow the KitchenAid to knead the dough for about 5-7 minutes. The dough should form into a cohesive ball and have a smooth, elastic texture. It should be pliable but not sticky to the touch.
- Resting the Dough: After kneading, remove the dough from the mixer. Shape it into a ball and wrap it in plastic wrap. Let it rest at room temperature for at least 30 minutes. Resting allows the gluten strands in the dough to relax, making it easier to roll out and shape later.
- Checking Dough Consistency: After resting, check the dough’s consistency. It should be soft yet firm, and when pressed with a finger, it should slowly spring back.
By following these steps, you’ll have a well-prepared pasta dough, ready for rolling and shaping into your desired pasta type. The KitchenAid mixer not only simplifies the dough-making process but also ensures consistent results, making homemade pasta an enjoyable and rewarding endeavor.
Exploring KitchenAid Attachments for Diverse Pasta Types
From Spaghetti to Ravioli: KitchenAid’s Pasta Versatility
One of the joys of using a KitchenAid mixer for pasta making is the wide range of attachments available, each designed to create different types of pasta. These attachments transform your mixer into a versatile pasta-making machine, allowing you to experiment with various shapes and styles. Let’s explore the options:
- Pasta Roller Attachment: This is your starting point for most pasta types. The roller flattens the dough to your desired thickness, perfect for creating sheets for lasagna, cannelloni, or even hand-cut shapes. You can adjust the roller to various settings, depending on how thick or thin you want your pasta.
- Spaghetti Cutter Attachment: Transform your rolled pasta sheets into classic spaghetti strands with this attachment. It cuts the dough into perfect, uniform spaghetti noodles, ideal for traditional Italian dishes.
- Fettuccine Cutter Attachment: For those who prefer wider noodles, the fettuccine cutter is the perfect tool. It turns your pasta sheets into beautiful ribbons of fettuccine, suitable for heavier sauces and hearty meals.
- Ravioli Maker Attachment: This attachment takes your pasta making to the next level. It helps you create stuffed ravioli with ease, sealing and cutting the dough as you fill it with your favorite ingredients.
- Gourmet Pasta Press: For more adventurous pasta makers, this attachment allows you to make several extruded pasta shapes like bucatini, rigatoni, and fusilli. It’s perfect for experimenting with different types of pasta dishes.
Each of these attachments offers a unique way to enjoy homemade pasta, expanding your culinary repertoire. Whether you’re in the mood for a simple spaghetti dinner or looking to impress with homemade ravioli, your KitchenAid, equipped with these attachments, makes it all possible. In the next section, we’ll delve into the techniques of rolling and cutting pasta, bringing your creations from dough to delicious.
The Art of Rolling and Cutting Pasta with KitchenAid
Achieving the Perfect Pasta Thickness and Shape
Mastering the art of rolling and cutting pasta is a crucial step in your pasta-making journey with KitchenAid. This process transforms your dough into the desired pasta shapes, from delicate angel hair to robust fettuccine. Let’s explore how to achieve the perfect pasta thickness and shape using your KitchenAid attachments.
- Preparing the Dough: Before rolling, ensure your pasta dough has rested and is at room temperature. Divide it into smaller, more manageable sections. This makes the rolling process easier and helps in achieving a uniform thickness.
- Using the Pasta Roller Attachment: Start with the pasta roller attachment set to the widest setting. Feed a piece of dough through the roller. Fold the dough in half and pass it through again. Repeat this process, gradually reducing the roller’s setting with each pass. This method not only thins the dough but also helps in developing its gluten structure, resulting in a silky texture.
- Achieving Desired Thickness: Continue to roll the dough, adjusting the settings on your KitchenAid to achieve the desired thickness. For most pasta types, a setting of 4 or 5 yields ideal results. However, for thinner pasta like angel hair, you may go down to a thinner setting.
- Cutting the Pasta: Once your sheets are rolled out, it’s time to cut them into shapes. Attach the desired cutter (spaghetti, fettuccine, etc.) to your KitchenAid. Gently feed the pasta sheets through the cutter. Catch the cut pasta with your free hand or let it fall onto a floured surface.
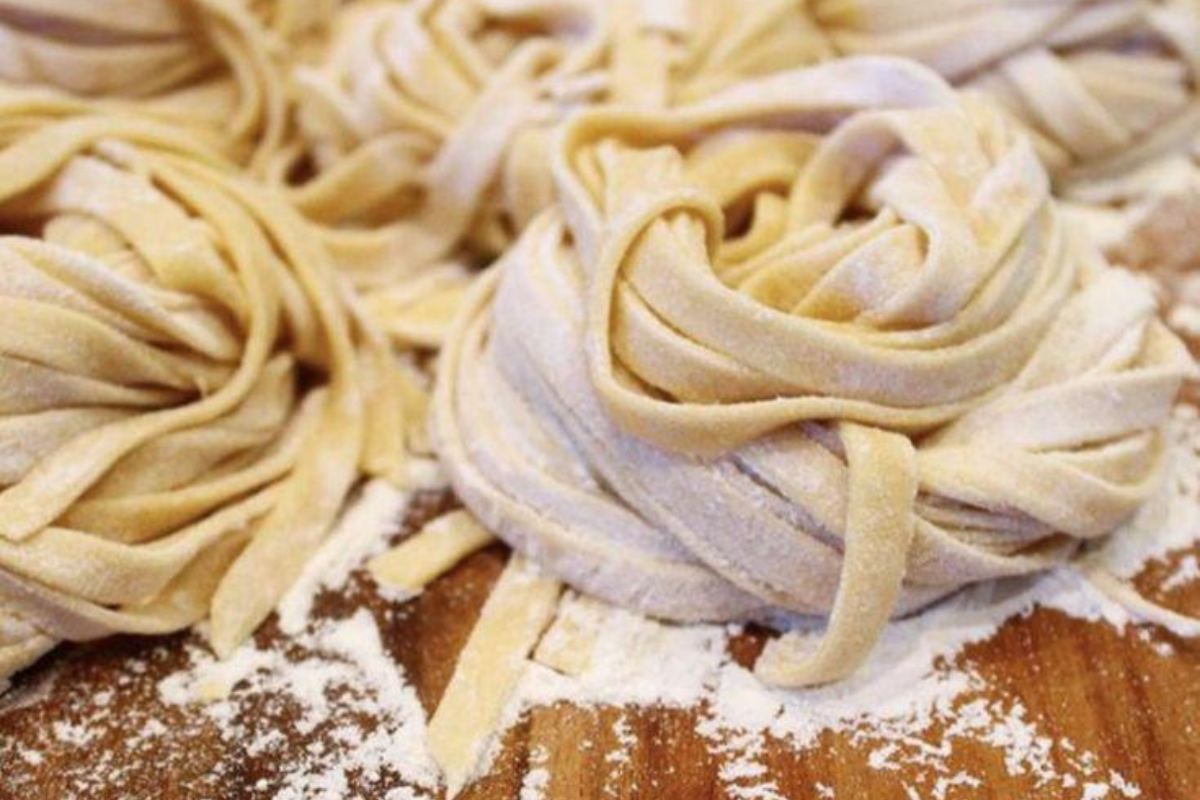
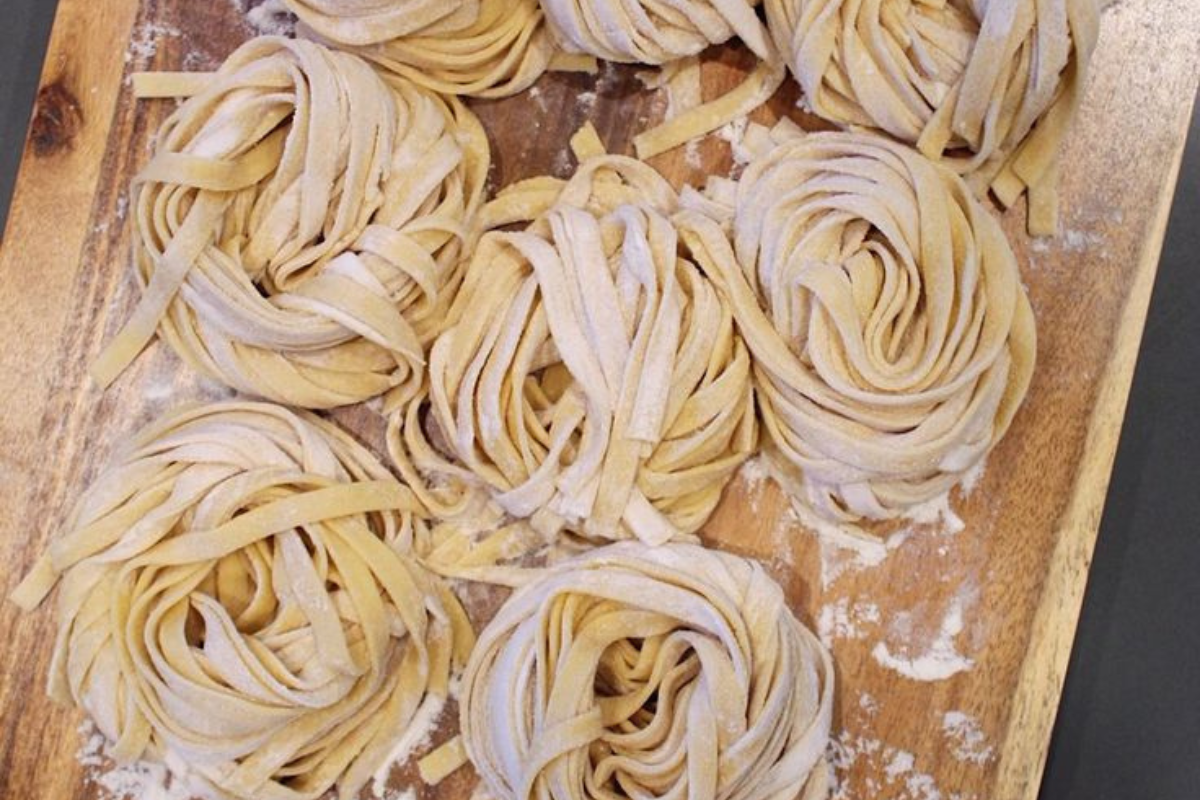
- Handling and Storing Cut Pasta: After cutting, you can either cook the pasta immediately or let it dry for later use. If drying, hang the pasta on a drying rack or lay it flat, ensuring the strands don’t stick together.
By following these steps, you’ll be able to roll and cut your pasta dough with precision and ease, thanks to your KitchenAid mixer and its attachments. This process not only ensures a consistent pasta thickness and shape but also adds an element of artisan craftsmanship to your homemade pasta.
FAQs
Q: Can I use regular all-purpose flour for making pasta?
A: Yes, all-purpose flour is a great option for homemade pasta. It’s easily accessible and works well for a variety of pasta types. However, for a firmer texture, you might consider mixing it with semolina flour.
Q: How long should I knead pasta dough in the kitchenaid pasta recipe?
A: Kneading pasta dough in the kitchenaid pasta recipe typically takes about 5-7 minutes. You’re looking for a smooth, elastic texture. Be careful not to over-knead, as this can make the dough tough.
Q: Can I make pasta dough in advance?
A: Absolutely! Pasta dough can be made in advance and stored in the refrigerator, wrapped in plastic wrap, for up to 2 days. Just bring it to room temperature before rolling and cutting.
Q: How do I prevent my pasta from sticking together after cutting?
A: To prevent sticking, lightly dust the pasta with flour after cutting. If you’re not cooking it immediately, hang the pasta on a drying rack or lay it flat on a baking sheet, ensuring the pieces aren’t touching.
Q: Is it necessary to dry pasta before cooking?
A: It’s not necessary to dry pasta before cooking, especially if you’re going to cook it immediately after cutting. Drying is only needed if you plan to store the pasta.
Conclusion
In our comprehensive exploration of making pasta with a kitchenAid pasta recipe, we’ve journeyed through the basics of crafting the perfect dough, the nuances of rolling and cutting, and the joys of flavor experimentation. Whether you’re a novice or a seasoned pasta enthusiast, the kitchenaid pasta recipe and its attachments offer a world of culinary possibilities, transforming simple ingredients into exquisite homemade pasta. Embrace the art of pasta making and enjoy the satisfaction of creating something truly special from scratch. Remember, each batch of pasta is not just food; it’s a reflection of your creativity and passion in the kitchen. Buon appetito!